


- 39 secondsThere is a hacker attack every 39 seconds
- Under attack55% of SMBs have experienced a cyberattack in 2020
- Every day30 000 websites get hacked every single day
Get peace of mind with WebTotem
Stop worrying
Stop worrying about data and money loss and sleep tight, while WebTotem is doing all the work for you.
Save time and money
Save time and money on employing security specialists or trying to secure your websites on your own.
Fast setup
Forget about complicated setup, professional jargon or additional coding. Get your websites secured in 5 minutes.

All-in-One solution that protects your website
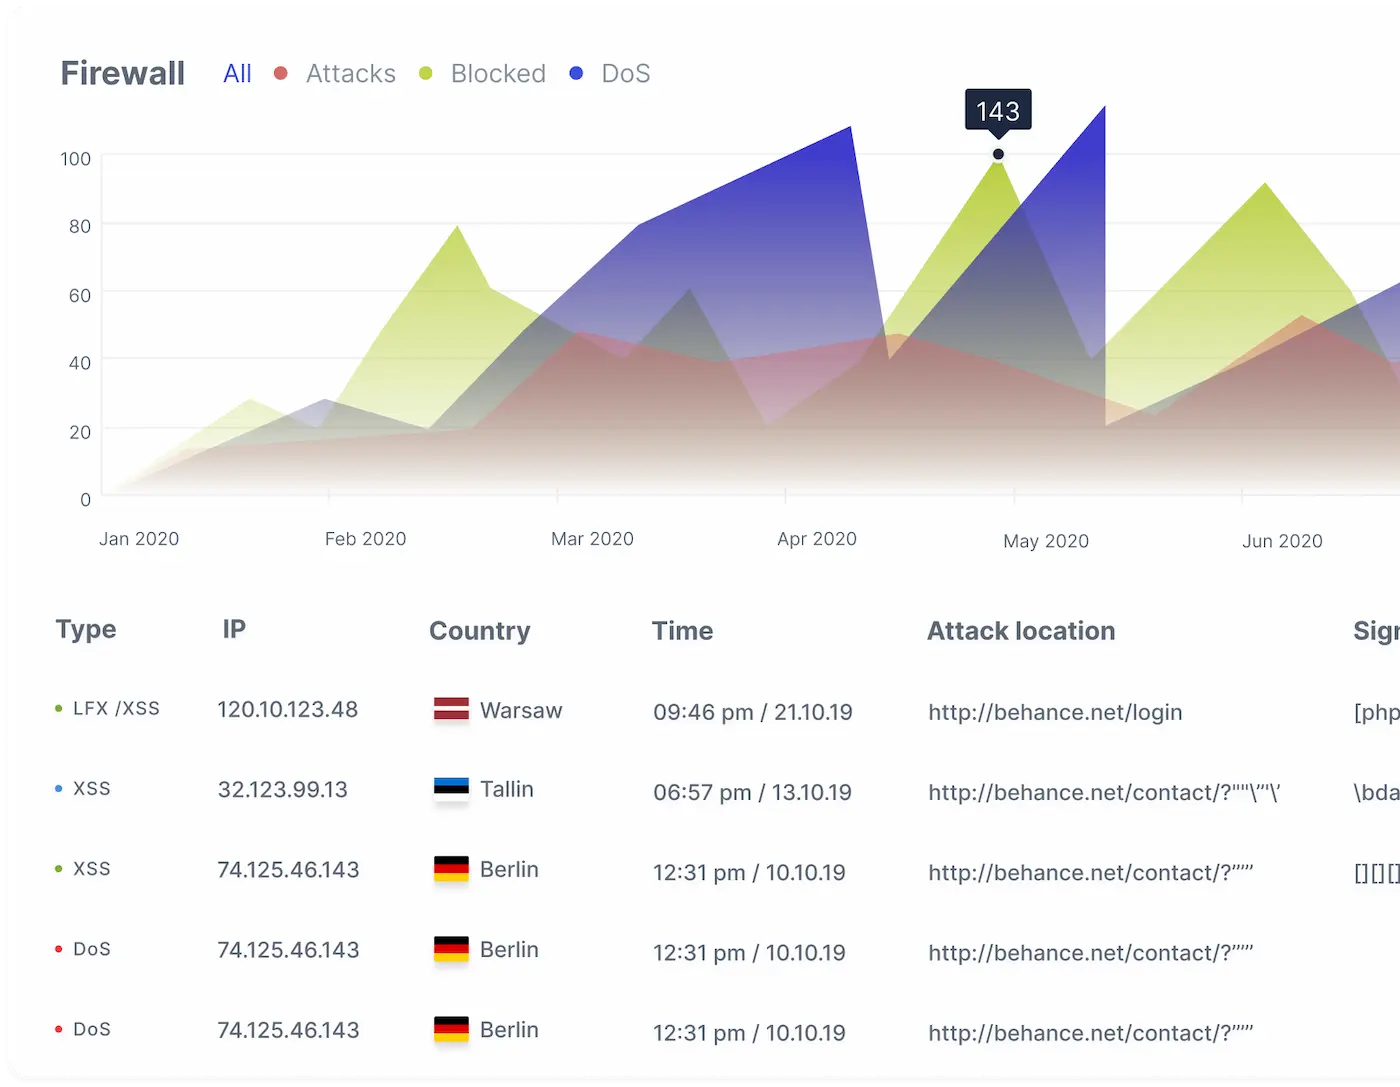
Firewall
AI-inspired proactive protection against intrusions and new emerging threats
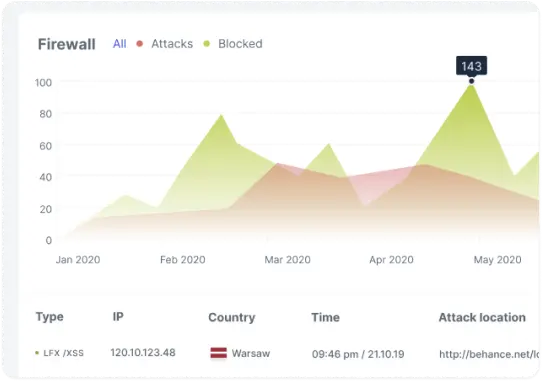

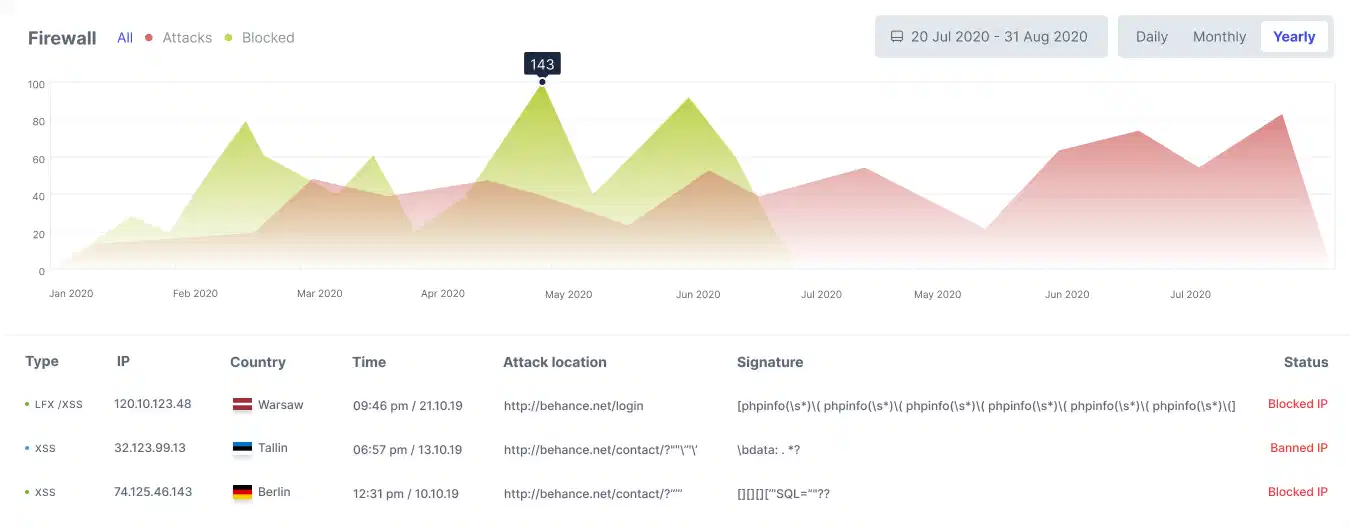
Attack report
Find out information about hackers: IP, time of attempts and country of origin and take proactive measures

AI and Herd Immunity
Only legitimate users have access to your website. AI Firewall creates individual protection for each website, taking into account all its specifics

Brute Force Protection
Get protection from hackers' repeated attempts to gain access to your account
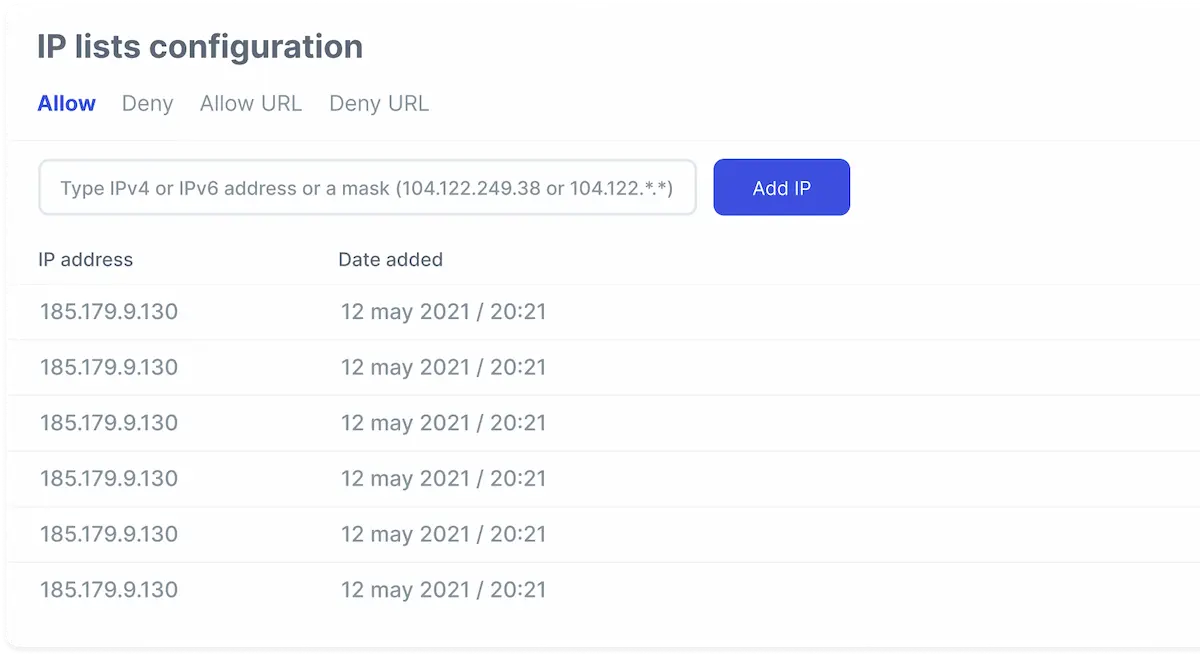
Custom rules
With a click of a button you can block or whitelist an IP and easily add exception rules to URLs
External monitoring
Protect your website from the attackers that intended to hack other websites. Firewall has a malicious IP database and can block them in advance
Dos Protection
Keep your website available and working with protection from denial-of-service attacks
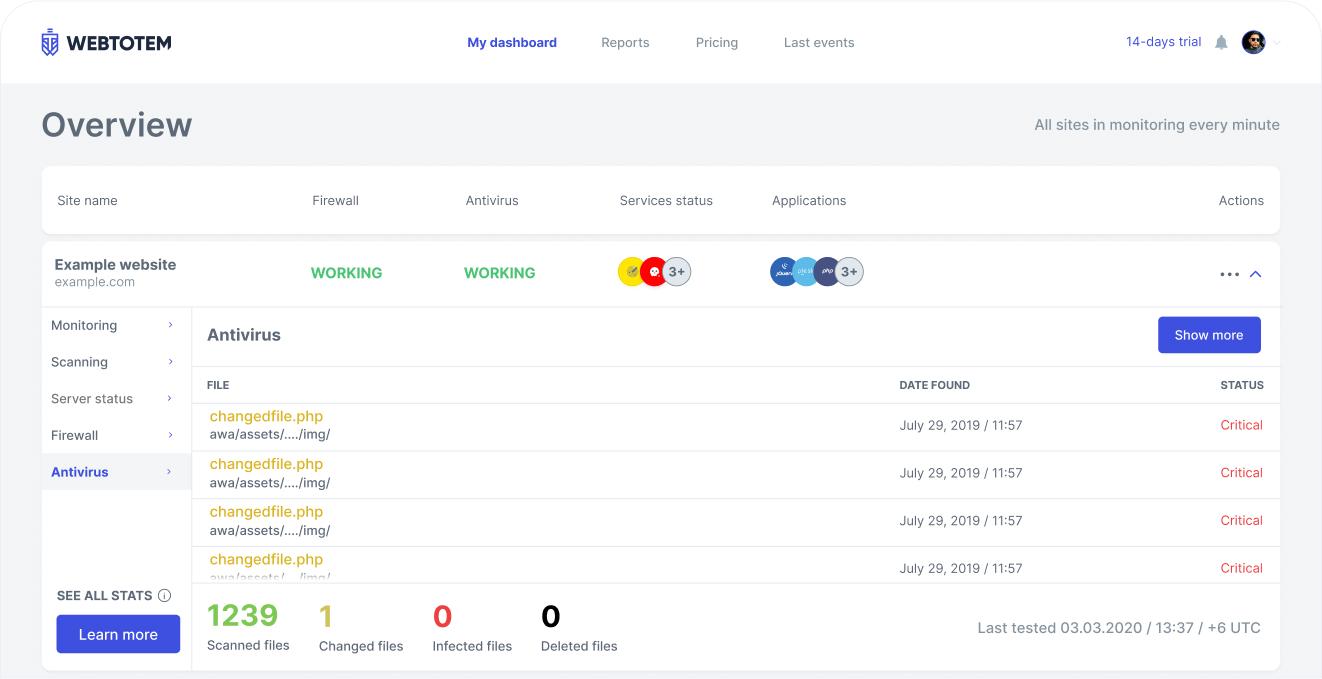
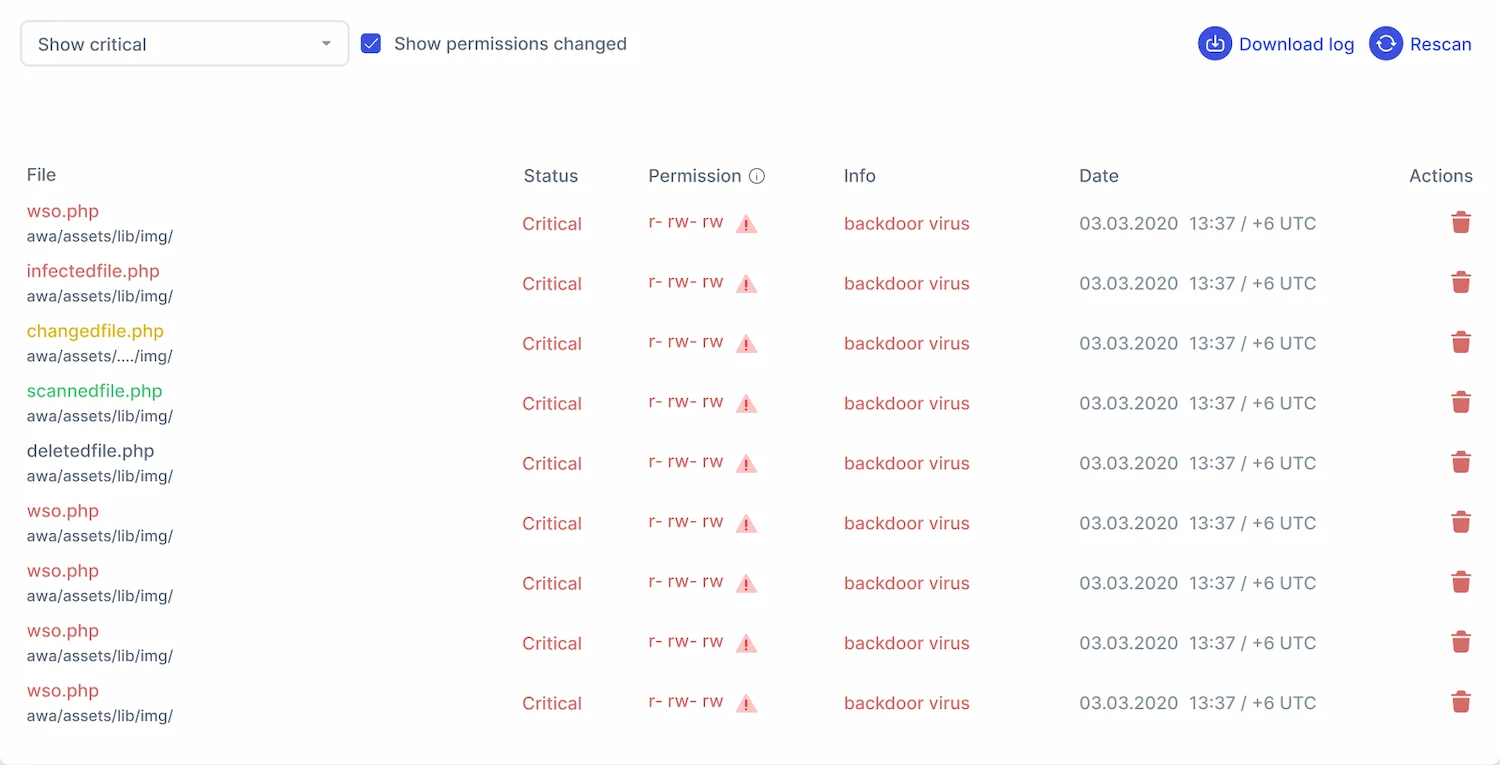
Antivirus
Server-side scanner that neutralizes malware in one click and notifies about new, modified and deleted files
Malware Removal
It helps you take actions when malware is found. Delete or exclude infected files with one click
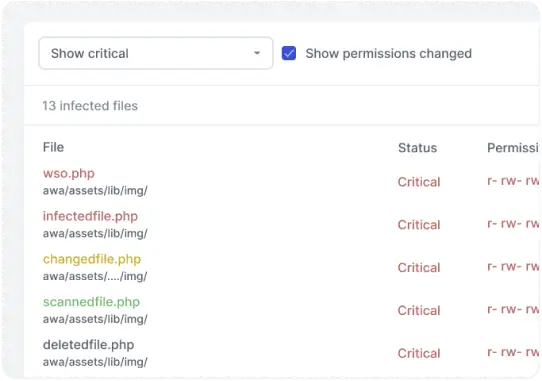
File control and permission checks
Control your file changes and make sure no infected files are uploaded. Antivirus scans new files automatically and detects the changes in rights and permissions
Fast and unlimited
It scans automatically and whenever you want
Monitoring
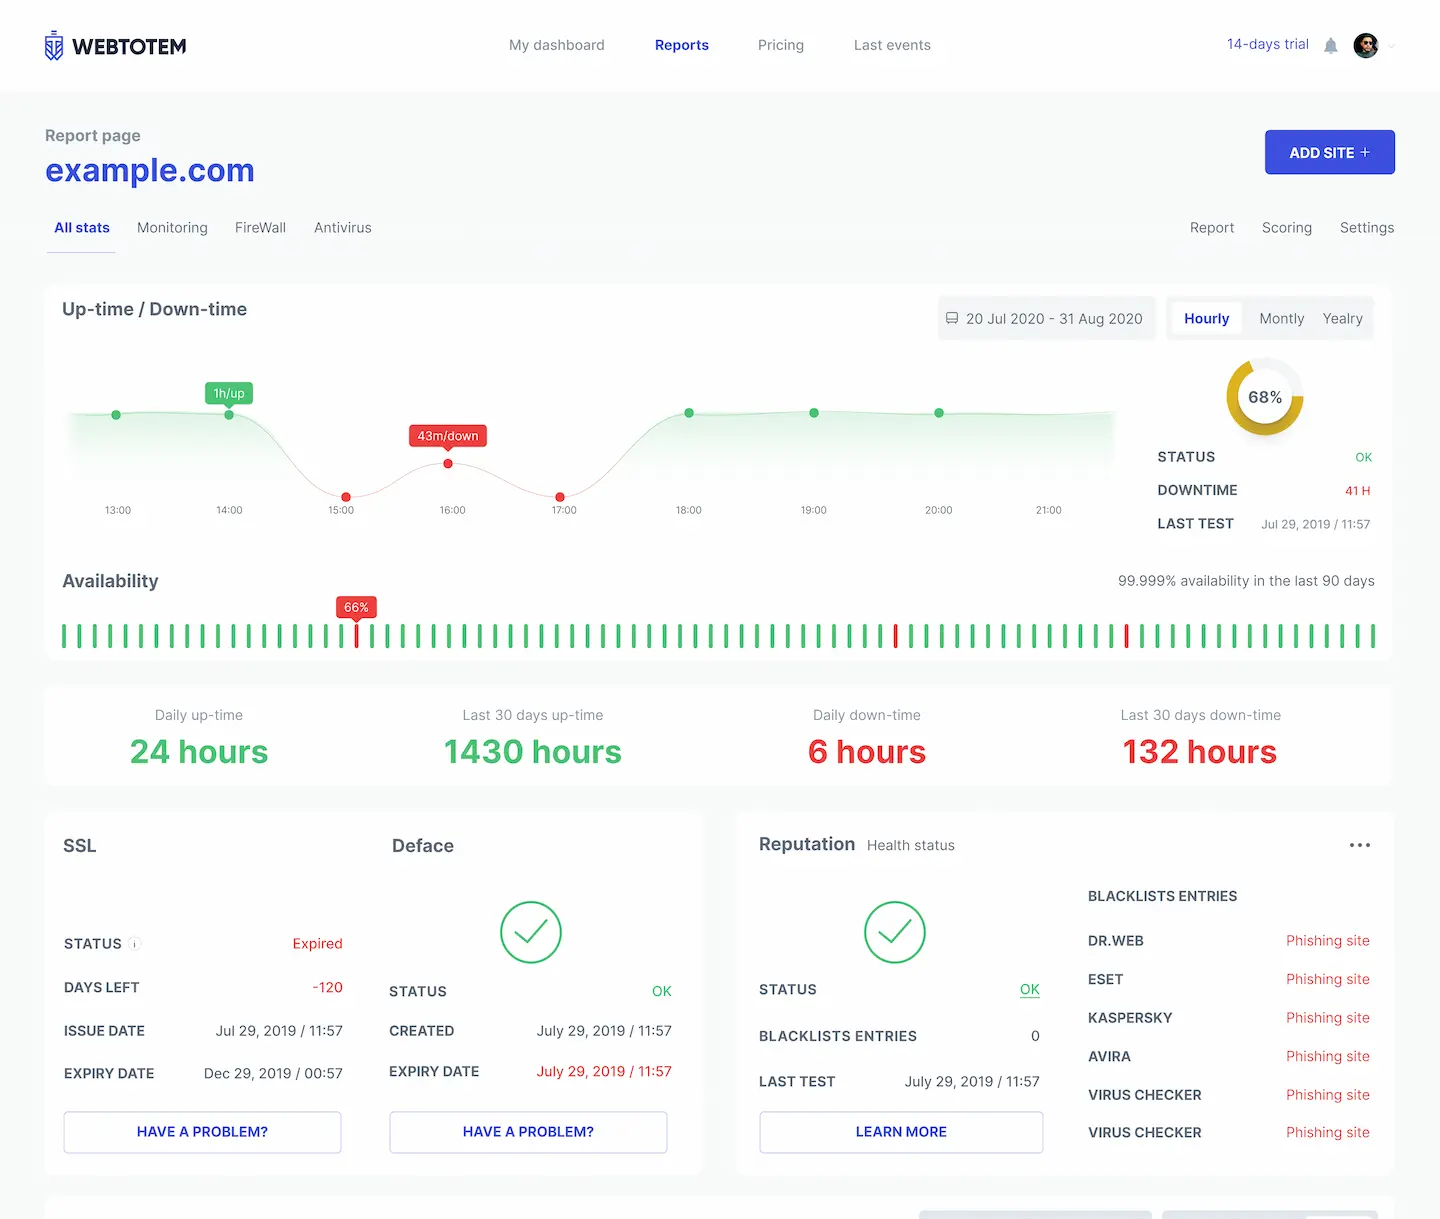
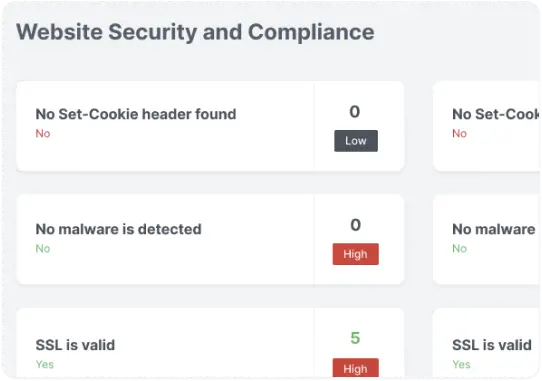
Continuous external monitoring of downtime, web reputation, SSL, domain expiry and much more
SSL
WebTotem won’t let you miss the day of SSL Certificate expiration. Plan certificate prolongation in advance
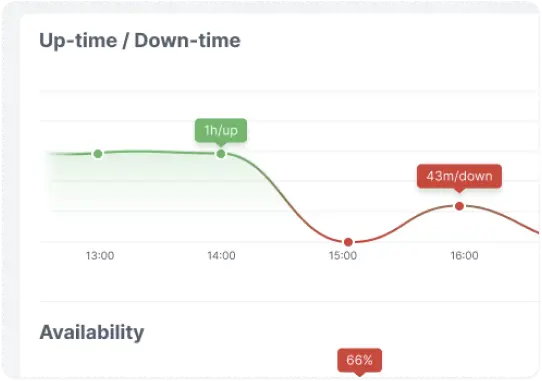
Availability
Make sure that your site is accessible to customers and you haven’t lost your traffic
Reputation
Take care of your presence in search results and take actions if your website is blacklisted
Deface scanner
Make sure that no page of your website has been replaced by a hacker and your website does not mislead your customers
Server Resources
Boost your website performance. Control RAM/CPU load data and server disc usage
Vulnerability Management
Continuous identification and elimination of vulnerabilities
Open Ports Scanner
Detect open ports on the web server that can be exploited by intruders.
Scoring
Find out your website security pain points and follow our recommendations to reduce the efficiency hacker attempts.
Attack report
Find out information about hackers: IP, time of attempts and country of origin and take proactive measures
AI and Herd Immunity
Only legitimate users have access to your website. AI Firewall creates individual protection for each website, taking into account all its specifics
Brute Force Protection
Get protection from hackers' repeated attempts to gain access to your account
Custom rules
With a click of a button you can block or whitelist an IP and easily add exception rules to URLs
External monitoring
Protect your website from the attackers that intended to hack other websites. Firewall has a malicious IP database and can block them in advance
Dos Protection
Keep your website available and working with protection from denial-of-service attacks
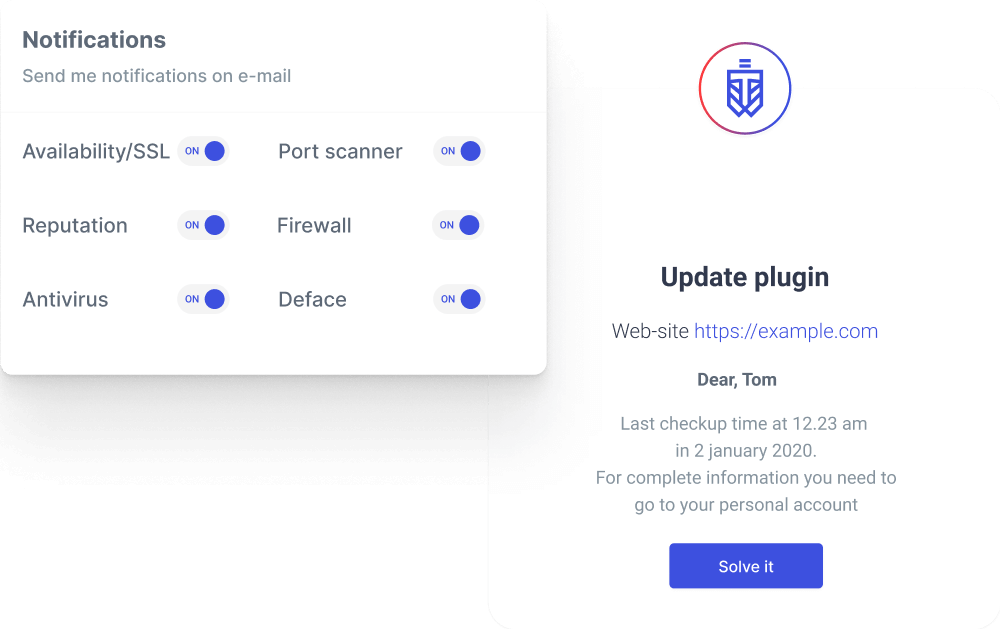
Comprehensive protection
Get notifications on security and examine the reports on the cyber threats activity
Customize the access to your websites by adding certain IPs to white/blacklists
Detect infected files and deactivate them
Protect websites from hackers, bad bots, SQLi, XSS, spam, Path traversal


Advanced security
Collaboration
Monitor all your websites from one dashboard and find pain points at a glance
Send detailed reports on the security issues to your clients
Invite team members for collaboration
Prevent easily. Detect smartly. Respond fast.
Your personal AI-powered web application security assistant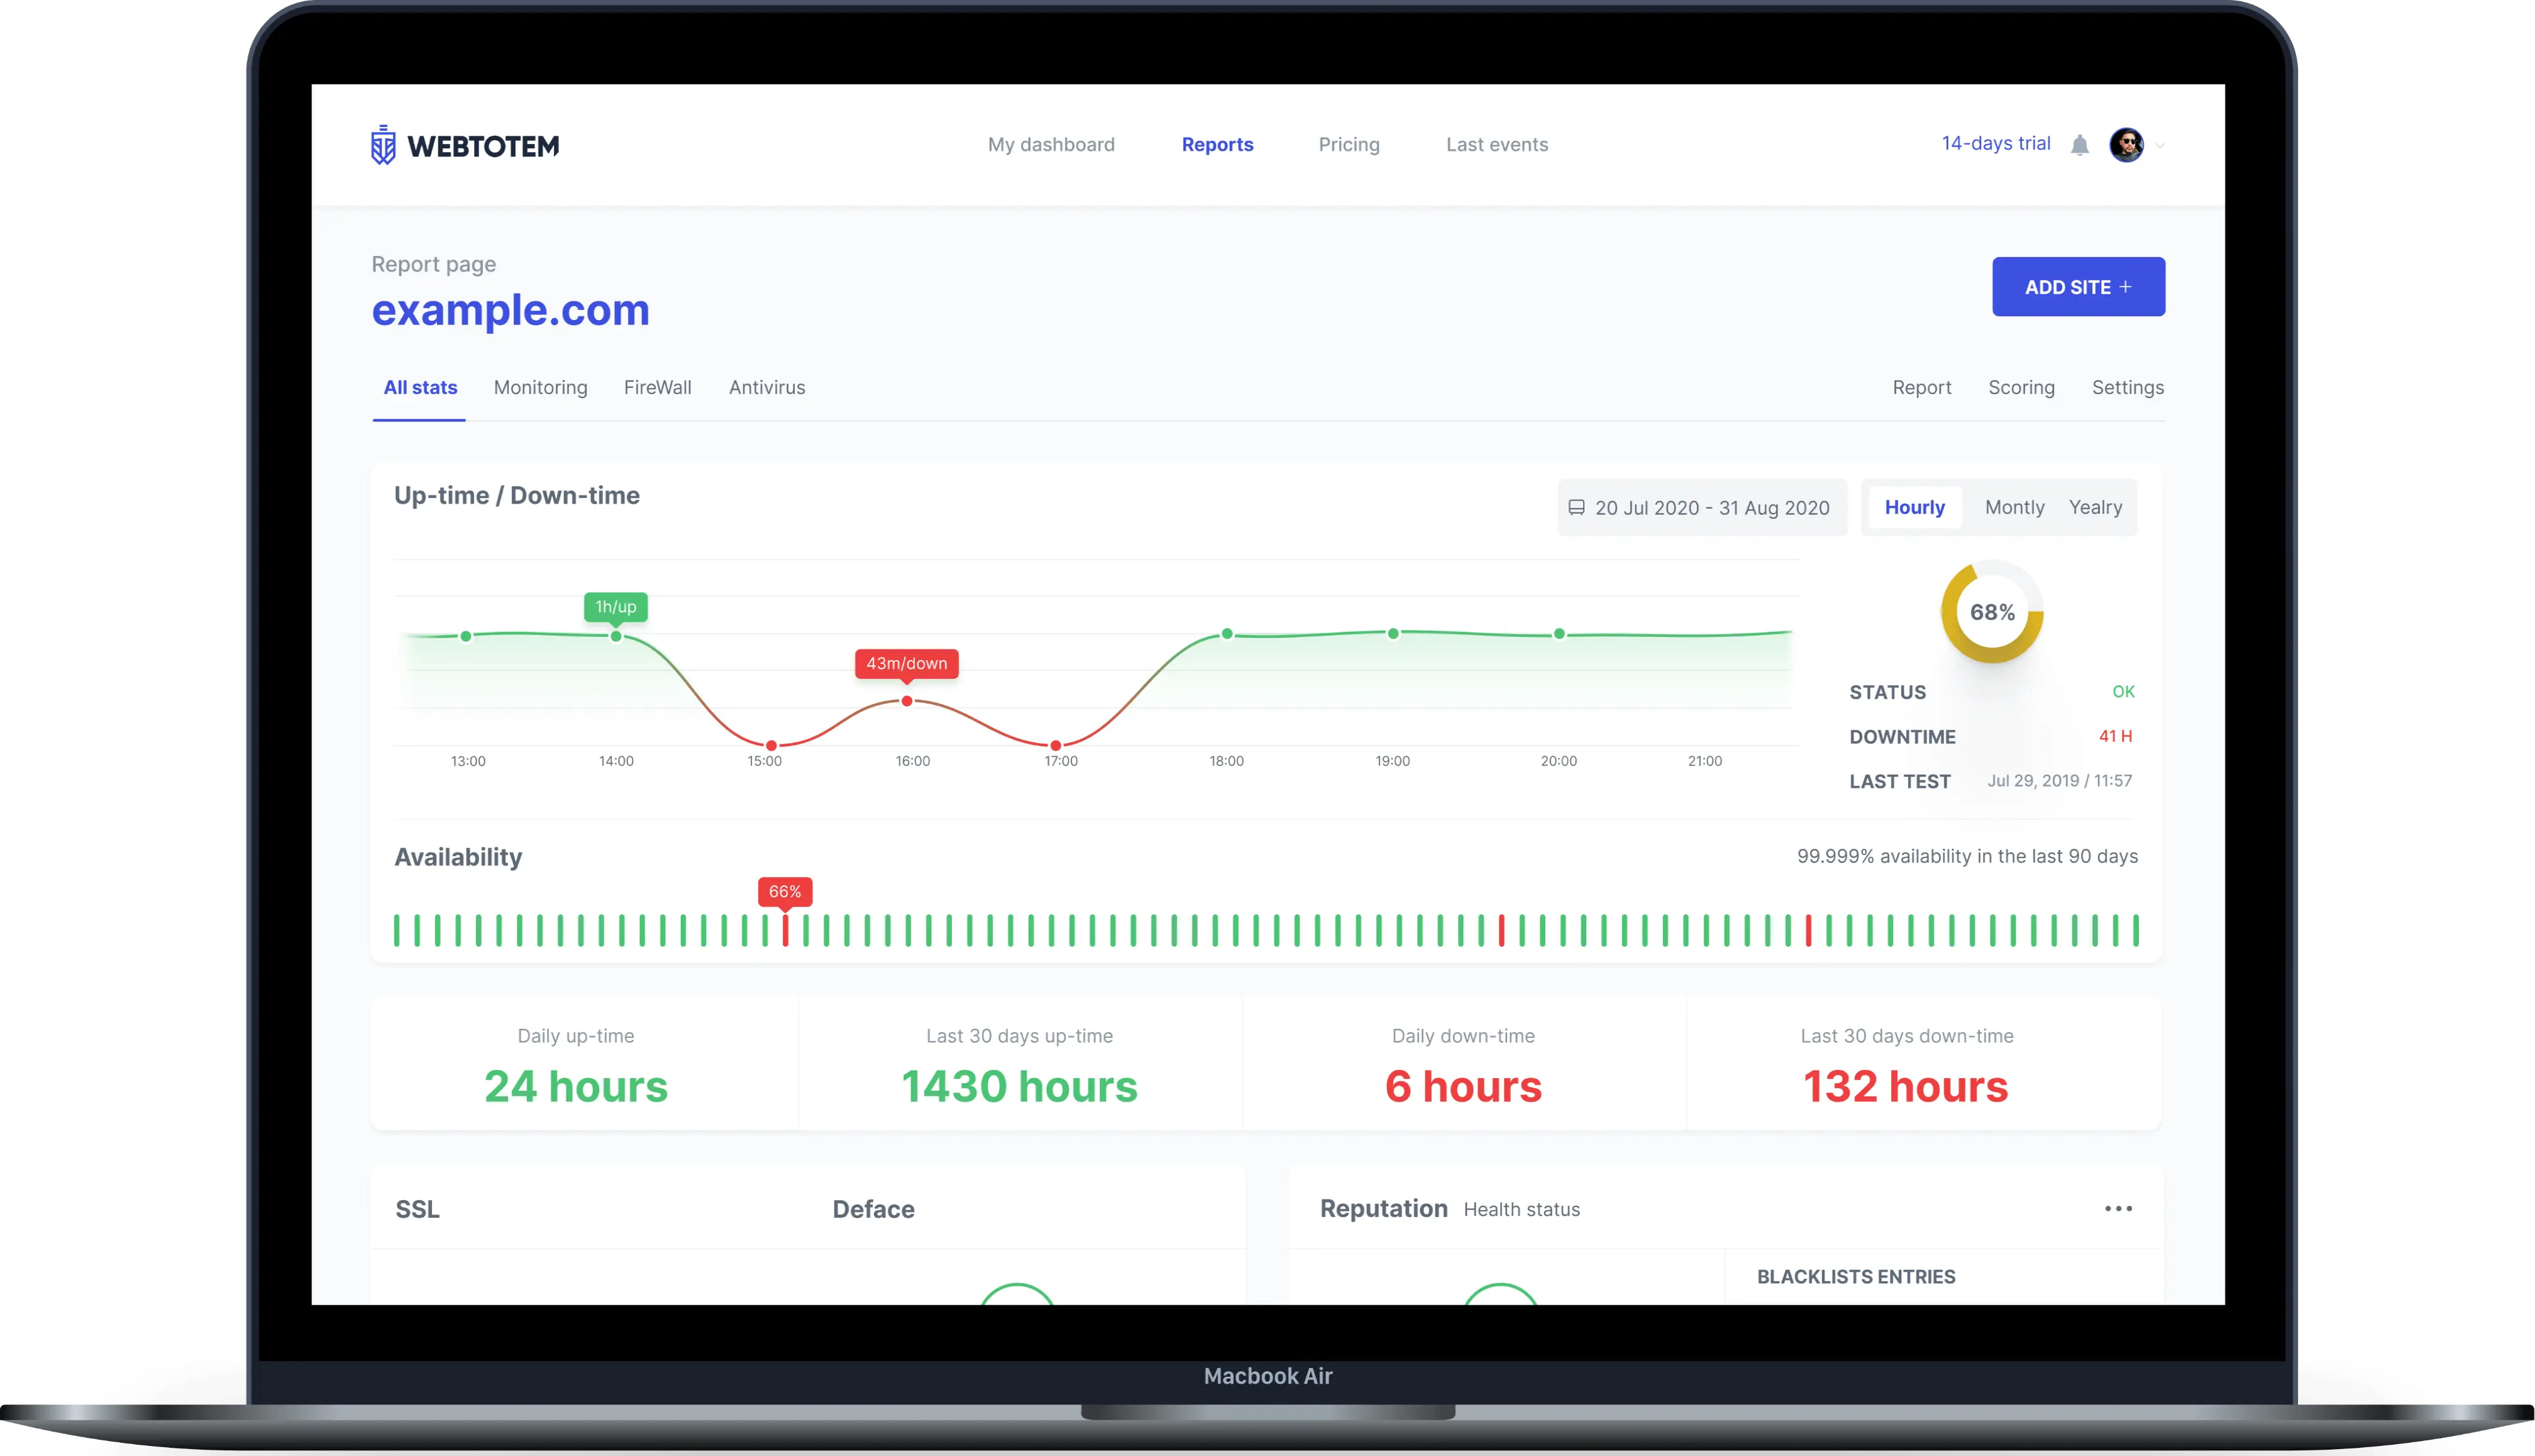
Single
The plan is perfect for a single website
$8
What's included:
- 1 Site
- Antivirus
- Web application Firewall
- SSL monitoring
- Open ports & path scanner
- Availability monitoring
- Wordpress, Plesk, Joomla, Drupal
Standard
The plan is perfect for freelancers
10$
What's included:
- 3 Site
- Everything in Single
- Website security scoring
- Blacklist monitoring
- Technology & Vulnerability scanner
- IP Reputation
- Server Resources monitoring
Professional
The plan is perfect for agencies
$18
What's included:
- Up to 50 websites
- Everything in Standard
- Central monitoringd dashboard
- Whitelabel PDF reports
- Up to 3 team members
- De-blacklisting
- High priority event support
Custom plan
If you need enterprise coverage for multiple websites, contact for a custom solution.
What's included :

Bug Bounty Plan
If security is your top priority, this plan is your ultimate solution to proactively protect your systems.
What’s included:
- All features in Professional
- Real-time dashboards
- Customizable reward tiers
- Vulnerability triage and prioritization
- Self-managed setup and management for 1 domain
- Access to 2,000+ ethical hackers / bug hunters
Get live-chat support 24/7
Need help with installation?
Having questions about the plans or features?
Contact support team 24/7 via chat or email: support@wtotem.com